Though not all songs call for a percussion track, those that do obviously benefit from a killer drum kit. In chiptune, this is no exception. Especially with limited channel economy, one could argue that drums can make or break a song. In this short series, we’re going to take a look at some basic strategies for creating a drum kit in FamiTracker that will end up sounding something like this:
Let’s begin by looking at a few different ways to craft a kick drum.
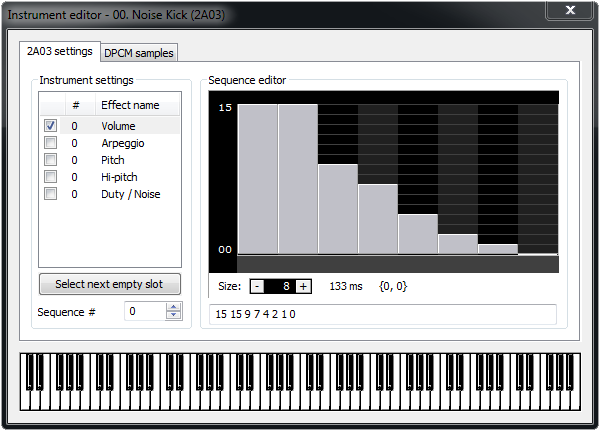
As nearly all drum hits can live happily in the noise channel, we’ll start with a noise kick. Begin by creating a new instrument and opening it in the Instrument Editor. By default, the Volume page will be selected in Instrument Settings. Go ahead and set the Size to about 8 steps. To ensure your kick has a strong attack, give the first step or two a high value and follow with a smooth, downward ramp. To avoid having your kick sustain indefinitely, set the last step to value 0.
Example of noise kick volume sequence
By nature, a kick drum is low-pitched. With any other type of kick, you would want to trigger your kick with a mid-range note and then sweep the pitch downward. But since the noise channel is limited to fifteen unique “pitches,” it’s preferable to just trigger a noise kick with a low note and let your volume envelope do the heavy lifting.
Noise kick played at 2-#
While not completely necessary, you could embellish your noise kick by playing with the Arpeggio and Pitch settings. For example, you could blend a little cymbal into your kick by adding a short and simple arpeggio sequence.
Various noise kicks with embellishments
Another way to make a kick drum is with the triangle channel. The biggest benefit of a triangle kick is that it will introduce a considerable amount of bass to your drum kit. The downside, however, is that it will eat into a tonal channel, limiting its versatility. If a triangle kick sounds right for you, create another new instrument and open up the Instrument Editor. Since the triangle channel has no volume control (it can only be turned on and off), our volume sequence will be more about duration than dynamics. Similarly to our noise kick, the longer the kick remains on, the more body it will have. However, unless you’re using the triangle channel for percussion only, it’s crucial to return to normal pitch shortly after the kick is triggered. A sequence Size of 7 steps (6 active, 1 inactive) should be about the maximum length.
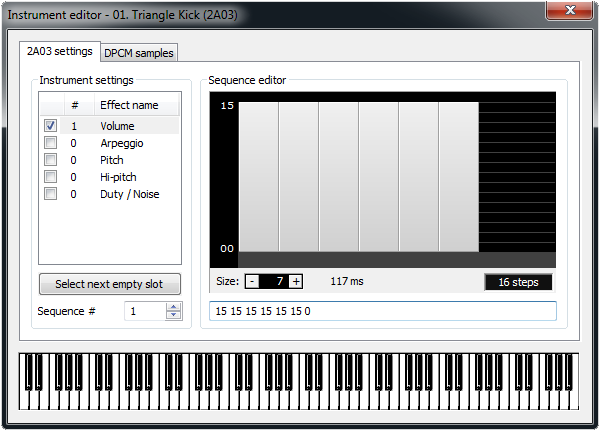
Example of triangle kick volume sequence
The other vital component of a triangle kick is a pitch sweep. You could certainly accomplish this manually in the Pattern Editor with the 2xx effect. However, as our noise kick was confined to the Instrument Editor, why not do the same with the triangle kick? Jump over to the Pitch settings, click Select next empty slot, and set the sequence Size to 1. We can mimic the 2xx effect by providing a low value like 128 and then creating a loop point (left-click the Length field).
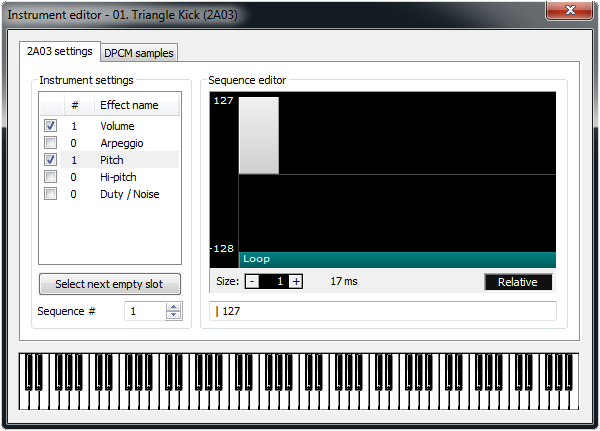
Example of triangle kick pitch sequence
Triangle kick played at C-5
If you are so inclined, you could also use either of the pulse channels to similar effect. This is a less common application, though, as many prefer to leave the pulse channels available for other instruments. If you decide to tackle a pulse kick, though, a downward pitch slide using a 50% duty pulse will probably do the trick.
Pulse kick played at C-4
Tonal and noise kicks can also be layered (often to great effect). If you want to really stack up your kit and give that kick some extra oomph, try combining a noise kick with a triangle kick. It really packs a wallop!
Triangle and noise kick played simultaneously
Our last technique involves the DPCM channel. This channel allows for short, low-quality sample playback, enabling you to create semi-realistic drum sounds. Unlike the previous techniques, this method does not always benefit from layering because the triangle and noise channels are directly affected by the level of the DPCM channel. You could, of course, experiment with how to optimize these finicky relationships, but many choose not to for the sake of simplicity. If you have already created a few instruments, you don’t need to create another since the DPCM channel does not use any of the settings in the 2A03 Settings tab. If it makes more sense to have dedicated instruments used exclusively for DPCM, there’s no harm in staying organized. Once you’ve selected an instrument you want to use, you can start pulling in samples.
While you can definitely create your own samples (which is really fun), there are a lot of great sample packs out there. For example, this massive sound pack (credit: Patrick “Bucky” Todd) includes over 200 sample rips from classic video games. However you decide to make or acquire your .dmc files, loading them is as easy as clicking the Load button in the DPCM Settings tab of the Instrument Editor. You can then set which notes to map each sample to by selecting the desired Key in the Assigned Samples panel, clicking the desired sample in Loaded Samples, and then pressing the ← button. If you want to modify the sample’s pitch, you can select a Pitch value as well.
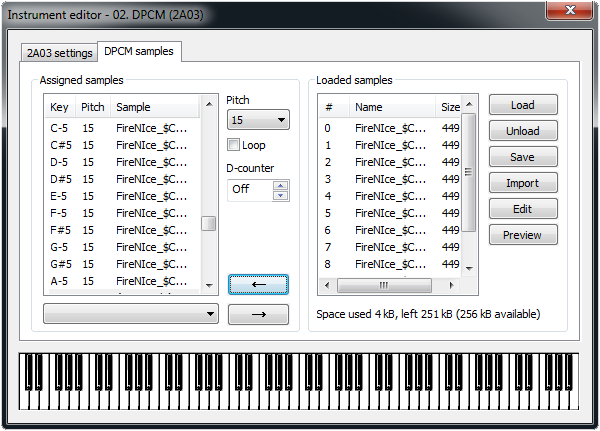
You can load up to 64 unique samples with a maximum total size of 256 KB.
DPCM kick
So there you have it—three approaches to kick off your FamiTracker drums with a bang! If these methods become part of your routine, great! Don’t let that stop you from continuing to refine your sound and try new things. If you want to download the instruments made in this article, refer to the link below. And finally, this is in no way a definitive source of truth. While there may be plenty of “wrong” ways, there are just as many (if not more) ways to get valid, usable results. Until next time, keep chipping!
Want some practice?
Use the button below to download the instrument files used in today's example!
Kick Drum Instrument (.fti) Files